Do you want to give your Moke a fresh and sporty appearance with the addition/replacement of rubber Wheel Arch Spats? Can't find them anywhere? Don't want to spend $130 per pair on eBay for Chinese copies? Don't worry - read on to find out how you can make your own that look just like the originals! Copied from a post on the Mokes Inc. Forum by SA Mokin.
Difficulty Rating - Basic/Intermediate
Cost - Under $150 for fronts and backs (2 pairs)
Time Off the Road - 0
Time to Complete - 2 to 4 hours (Helper required)
Tools needed:
Drawing pen
Straight edge/ruler
Masking tape
Hobby knife set
Dremel sanding tool (or generic rotary hand tool with many attachments)
Drill
sand paper / sanding disc
(1) White Out pen
(1) pair of aircraft tin snips ($2 shop/ Hong Kong Shop)
As our favourite automobiles are all at least 29 years old and older - it is becoming increasingly difficult to source original new parts to restore our machines. Reproduction parts are a popular alternative and with the invasion of the CHOKE and associated repro parts - you can pay through the nose for parts that may/may not fit your model of Moke - at "big" prices.
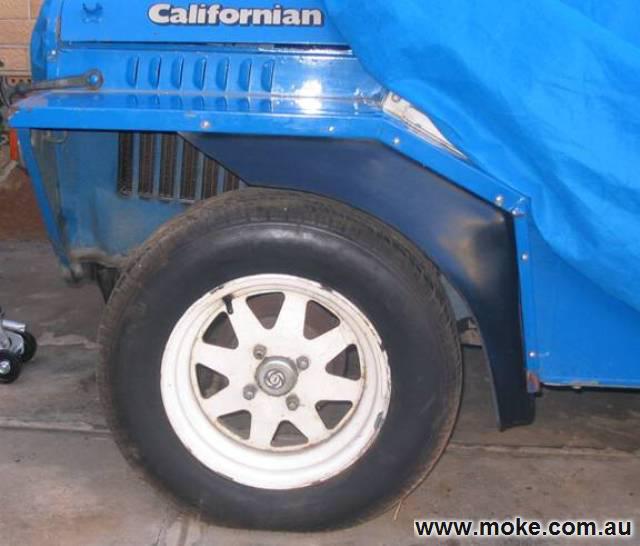
The Wheel Arch Spat first appeared on the Export model Mokes - and continued to be a popular feature throughout the cars production. The reasons they are so popular is the amount of spray it deflects off the tyre when driving in wet or muddy conditions. They also give the car a modern appearance. This part set is no longer available and at the time of writing only CHOKE stockists exist with front repros - however - whether your Moke came with them originally or not - let me show you how to make your own and give your car a new look, and save some dollars along the way, and get the satisfaction of making them yourself!.
Step 1: Source Material
The first step is to source your materials. You will need:
(5) large sheets of project paper or thin cardboard at least 80cm wide (available at most newsagents)
(1) piece of 2 Ply 6mm Insertion Rubber - 1200mm wide x 1000mm long (Clarkes Rubber www.clarkrubber.com.au)
(28) 3/16 x 38mm nuts & bolts (any hardware store)
Rubber Bonding Cement (any hardware store)
At least 1 original front and rear spat to make a template or a set of pre-made templates
Step 2: Identify/Prepare work area
You will also need to find an area to work in that will allow you to flatten the sheet of rubber and to trace, cut out, shape, and drill the spats. This whole process is a messy affair - so I caution you not to use the kitchen table to do this. The smell of burning rubber is also a side effect best kept to the shed or workshop. The debris is like sticky black sawdust so you may want to cover the immediate area with drop cloths.
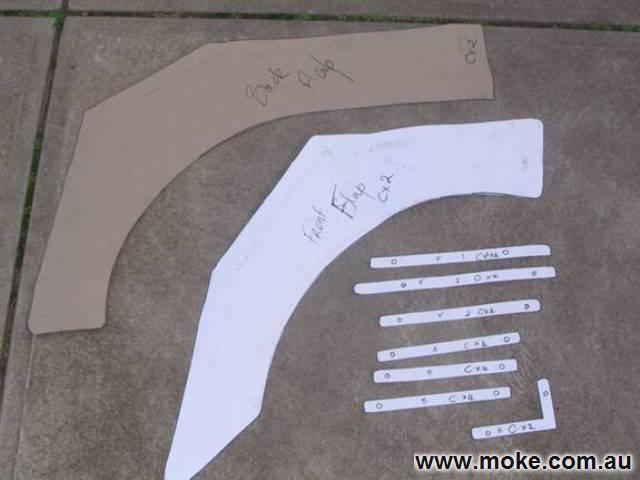
Step 3: Create Templates (if you have/can borrow originals to copy)
Take a sheet of project paper/thin cardboard that you can source at most newsagents - large enough to copy one spat. Lay the spat on the paper and carefully draw an accurate outline of the spat. As most originals are puckered due to the brackets they were attached with - make sure the spat is flat on the paper. Use weight temporarily to flatten out the spat to draw the outline. Then cut the spat shape out of the drawing as carefully and accurately as possible.
Make two copies of each spat. (resulting in two fronts and two rears)
Copy each rubber spacer with project paper as well - making sure to mark the bolt holes accurately - and number them according to their position on the spat as they are all different size spacers on the front spat and two different size spacers on the rear spat. Then cut the spat shape out of the drawing as carefully and accurately as possible. Label each piece Front or Rear and position of spacer for easy assembly later.
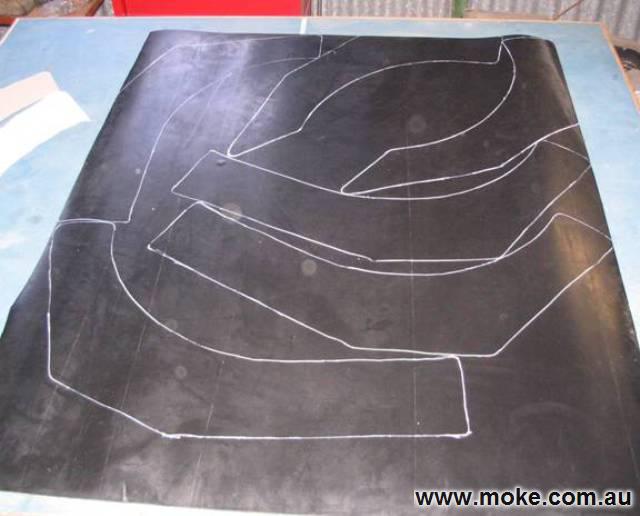
Step 4: Arrange Templates on Rubber Material
Next we want to arrange the templates on the rubber sheet in a way to maximise the efficient use of the material. (you can get an extra set of fronts or backs if you are clever in the layout!)
When you are happy about the positions - it should look something like the picture.

Step 5: Transfer the Template to the Rubber Material
Using a white out pen (also easily obtained at any newsagent or department store) - trace each item to the rubber - making sure that each template is secured to the rubber and does not move while you are tracing the item. The white outline can be easily seen when you are cutting the material - and the white out is also easily cleaned off after cutting. Each spacer will need to be drawn twice for each spat - as the thickness of the spacers are 12mm which is double the thickness of the rubber. The spacer pieces will be bonded together to form the final spacer to be used during installation of the spat.
Step 6: Cutting out the individual spat items (2nd person required)
This is one of the most difficult steps to complete and also the most time consuming. Your success will depend on your skill level, the material quality, and the tool(s) you use to cut the rubber. I can only give you my advice using my own experiences. You may have a better way of completing this task - and if so please share it with us!
The first thing I did was tried to get some idea of how easy/difficult it was going to be to cut the rubber. I identified an unused area to practice on and made a couple of cuts. I was very lucky in that I observed the shop keeper when he was cutting my piece off of a roll and saw he needed a fair amount of hand strength in cutting the rubber.
I chose an unused tool I had purchased from the $2 shop a year ago and had not used - a pair of aircraft tin snips. These allowed me to use my hand strength to "crank down" on the cutters to apply the needed force to cleanly cut the
rubber. Being a new tool - they were also very sharp and cut through the rubber with ease.
Here is where your helper is required. The rubber sheet is heavy - and I found it useful to have my helper grab one side of the rubber sheet and gently pull away from the cut. This seemed to assist in the speed at which I could accurately cut and helped me to be accurate because I did not have to worry about lifting the rubber sheet. Identify a piece close to the edge of the sheet and cut a line directing lining up with a line of a spat item. Slowly cut out each piece. Do not worry about rounding corners at this stage - but try to cut as close to the outline as possible. We will use the dremel to round corners/shape later. ( The “Dremel” is a brand named made in the USA hand rotary tool that has hundreds of attachments to let you do just about anything! www.dremel.com)
**Work smarter not harder here - cut the sheet so you can work on a small portion as you cut each piece.**
Hint: Try to be as accurate as you can here - the final product depends on it. Cut right on the line. Through the copy process - the outline will be slightly bigger so by cutting on the line this will help you to be as close as you can be. This will also stop you from having to do extra clean up later when shaping the corners occur. Take your time with each cut. I found that my tool cut in a 45 degree angle if I used a full stroke - so by doing "little cuts" I got a much better straight edge cut. You will have to assess how your chosen cutting tool is performing an adjust accordingly. This is not an exact science and any previous experience you may have in arts and craft can come in handy here.
 \
\
Step 7: Bonding the Spacers together
Take each set of spacers and carefully bond them together using the Bonding Cement and follow the instructions regarding its use. I used sandpaper to rough the surfaces before I applied the adhesive and used a weight to apply pressure while they were drying.

Step 8: Shape each spacer
Using my Dremel tool and a sanding attachment - I shaped each spacer to be as even as I could get them with my eye - making sure that the outer edges of each piece was smoothed and shaped into one uniform surface.
This was a quick but messy process - and depending on you cut accuracy will determine the time involved in this step. You could also use ordinary sandpaper but it would take a long time. As long as they visually look uniform and are close to the original size - this is adequate. (I'm fussy)
Step 9: Drill holes in spat and spacers
Using a drill and a 3.5mm/4mm drill bit - drill holes in the spacers and spats to line up with the existing holes in the car if you have them. - I used the existing spats and laid them over the top of the new cutouts and marked the position of each hole. I then drilled a small pilot hole on each mark. In turn I held each spacer in position and drilled the proper hole for the bolt through the spat and spacer together using the pilot hole. This method was successful. I also used the hole markings on the templates I created and drill the holes on those marks. This method was also successful. It is up to you. If your Moke has no existing bolt holes in the fenders - you may want to get your helper to hold the spat in position while you drill through the whole assembly.

Step 10: Test Fit
Here is your opportunity to get an idea if your spat is looking the part. Do a test fit without the metal brackets - and use the bolts to temporarily fix the spat to the car. Test each hole to see that the bolt fits easily through
each hole in the assembly. Make any necessary adjustments to the spats/spacers here.
Step 11: Clean up/ Shape spat
Your spats are nearly finished - but you may have noticed either uneven cutting edges or little cotton strings hanging out of the cut rubber from the ply. The corners of the spats also need to be rounded to look like the original. But at this point - you could customise the spats to look any way you wish - especially if you prefer a
different look or modified functionality. I used my Dremel once again to clean up the edges and round corners. I got rid of unwanted cottons by taking a disposable lighter and quickly heated the edges to burn the cotton away. Clean the spats and use Armour All polish to shine the spats up after handling it throughout the process.
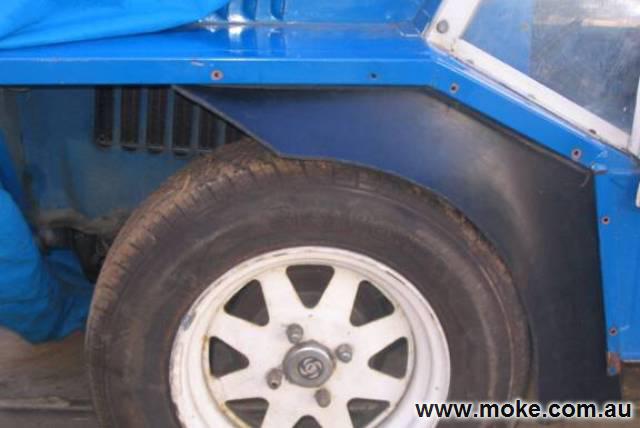
Step 12: Final installation of Wheel Arch Spat
Install each spat on the car using washers. A dab of oil on each washer will protect the paint when you tighten each bolt. Ensure that each spat has the required metal bracket installed in the correct direction to complete the job.

Total Cost of the Project:
Project Paper $ 4.00
Insertion Rubber $94.00
Nuts & Bolts $ 6.00
Bonding Cement $10.00
Total: $114.00
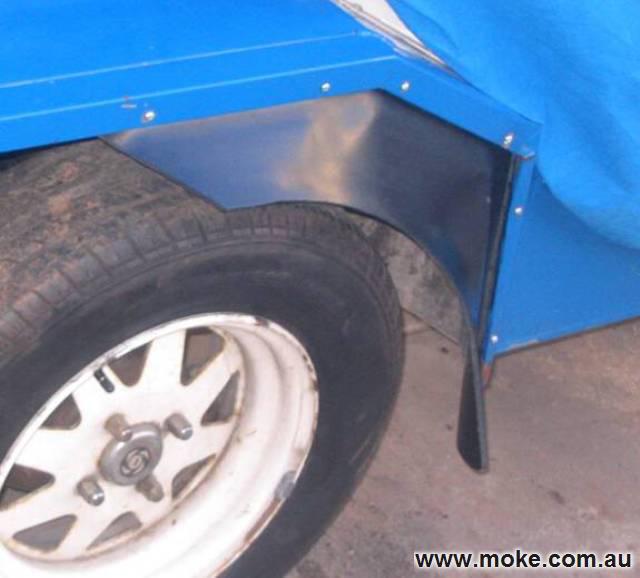
For those that do not have existing wheel arch spats – here is a look at the metal brackets that are used to shape/add stability to the spat. You can make your own out of some scrap thin steel sheet – cut and bend to suit.

The original post on the Mokes Inc. Forum by SA Mokin can be found here. Thanks to SA Mokin for all the photos and text, and for allowing it to be reproduced here.