One of the most common places for a Moke to leak oil is the seal on the rod change shaft. Fortunately it is also very simple to replace. Here's how to do it - the easy way!
Removing the Change Box
First step is to get your Moke up in the air, because you will be spending a bit of time under it. Whether you use a hoist, car ramps, jacks or bits of wood - make sure it is safe! Put the handbrake on, use chocks on the back wheels and put car stands under the subframe.
Inside the Moke, put the gearstick into reverse. Now remove the 4 screws that hold the boot to the floor and slide it up the stick. Push down on the bayonet fitting on the bottom of the gearstick and turn anti-clockwise. It should release the stick which can now be pulled out.

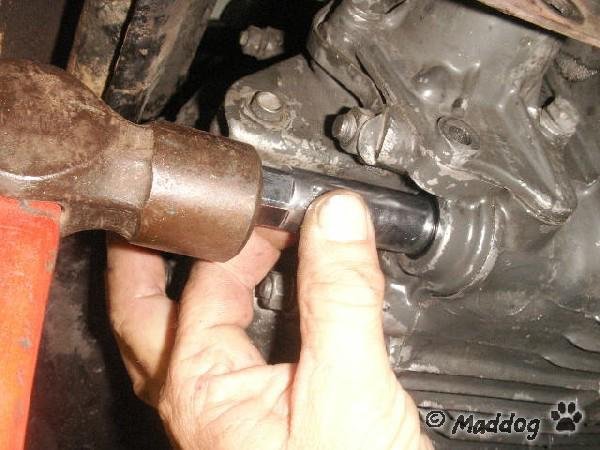
Crawl underneath your Moke, and put a texta mark around the front roll pin on the coupler between the change rod and the gearbox (the reason will be clear later on). Now, using a 5mm (3/16") pin punch, drive the pin out. These can be tight if worn, so 2 or 3 good hits are better than 20 half hearted ones. Be sure to hit the end of the pin square on so as not to deform the end of the pin.
If you can't get at the pin, check that you have the gearbox in reverse.

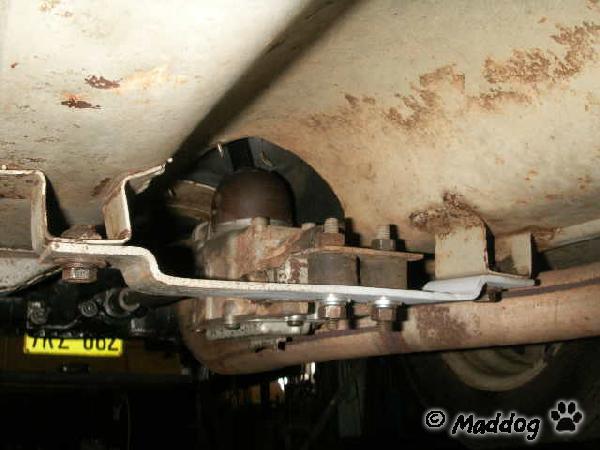
Next step is to remove the change box itself to get clear access to the seal. This is relatively straight forward, unplug the reverse switch wires, then undo the bolts (or nuts - depending on the year) that hold the support plate to the floor pan, and the bolt that holds the steady bar to the gearbox.
In some cases the exhaust pipe may prevent the bolt on the back of the gearbox from coming out. With a standard manifold, you may be able to just loosen the clamp and push the pipe aside. With 3 into 1 extractors, they usually have a slip joint behind the engine, and you can pull the pipe down and push it aside. With LCB extractors, you may have to remove them.

Inspection
Now you should have the rod change box out - time to have a look at the parts that may need replacing.
Check the roll pin, any obvious wear will mean a sloppy gear change, or worst case the pin will fall out leaving you with no gears. If the front one is worn, chances are the back one will be too. They are quite cheap, so normally they should just be replaced. They are also an unusual size - 7/32", so best to order them with the seal.
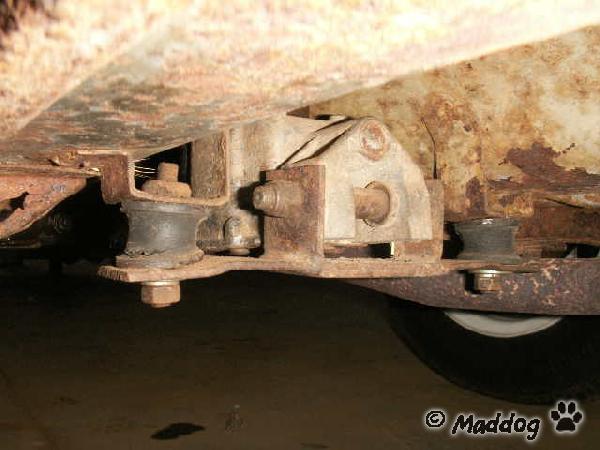
Check the 'cotton reel' mounts for the shift box - they play a very important part in the feel of the gear change. Often they have been soaked in oil for years, and if not broken are quite soft. Also check the bush in the back of the gearbox.
Here are all the parts you might need -

Removing the Seal
Okay. Time to get the old seal out.
Now sometimes you can pull them out with a sharp oil seal pick, but the first time I tried it, the previous owner had glued the seal in with gasket cement. All I did was destroy the seal - meaning it had to come out!
This might not be the quickest method, but it is guaranteed to work and may save some skinned knuckles. First drill two small holes in the seal, half way between the inner lip and the casing.

Now screw in two small self tappers, leaving about 1/4" under the head.

Using a pair of pointy nosed pliers, ease both the screws out a bit at a time, levering on the case

Once you have the seal out, clean up with a rag and have a good look inside. Sometimes you will find a second seal in there, and will need to repeat the process. The recess is 16mm deep, enough for 3 seals!
Replacing the Seal
You have a few options for the seal - one, two or three standard seals or the anti leak kits. I will leave the choice up to you, as it is personal preference, but just be aware if you intend to use the anti leak kit with the boot, you will need to drive the seal and support ring as far as possible into the gearbox casing to allow room for the rubber boot. Make sure you can fully engage second and fourth gear, as severe gearbox damage can occur if this boot does not have room to compress. Of course, the anti leak kit will work just as well without the boot.
I prefer to use just the aluminium support ring and one seal, and have had good results so far. Simply put a bit of grease or oil on the O-ring, and push the ring into the housing. Then drive the new seal in behind it. As the seal is rubber, there is no need for sealants. A 5/8" spark plug socket is the ideal tool to make sure it is installed square.
Mountings.
Over the years, many Mokes are modified or repaired, and one of the most common areas is the shift box mounts. Often the cotton reels break, and people repair them with whatever they have to hand. This is fine to get you home, but at some point it should be repaired properly. So in case your Moke has been modified, here is the correct setup for a Gal body Moke-
And this is for a pre-Gal body-
Replacing the Change Box
Start by hammering the front roll pin into the coupler so it just through into the centre. This will help line the holes up later. Make sure to hammer it into the side that will be on the bottom and where you drove the pin out from (remember that mark I talked about before?). It is possible for the shift rod to rotate freely when out, and although it won't line up very well when putting it back, it can be confusing as to why it won't fit.
Now get all your bolts ready, so you don't have to hold the box up with one hand while searching for them with the other. You should also undo all the nuts on the cotton reels and the bolt through the back of the change box and leave them loose until you get the box mounted and the bolt in the back of the gearbox, so there is no undue stress on any part.
Holding the box in place, insert the front steady bar bolt, and then the two bolts or nuts at the back. Check that the box sits parallel to the floor, and that the steady bar is square with the bush in the back of the gearbox. If not, you will have to loosen the big nut that holds the steady bar onto the change box. Slide the change rod forward to engage the rod on the gearbox - it should line up nicely. If you have hammered the roll pin in just enough, you should be able to push the shift rod sideways and feel the pin drop into place. Hammer it in until it is flush on both sides. Tighten all the bolts and nuts.
It is worth mentioning that the coupler on the shift rod is quite a loose fit on the shaft, so don't race out and buy a new one. The important part is that the roll pins are tight in it. The roll pins are also a loose fit in the shift rod and the rod that sticks out of the gearbox, and are made that way so the coupler can act as a universal joint.
Reconnect the reverse light wires, and make sure they are well away from the exhaust. Originally they were held to the subframe by clips, but if they are missing, you can zip tie them to the steady bar.
Replace the exhaust, put the gearstick back, hose off the oil stains on the driveway, and you're done!